Table of Contents
ToggleRecently updated on February 26th, 2025
A dynamic work environment requires effective communication and meticulous documentation to secure a company’s long-term success. Webex by Cisco, a platform for virtual meetings and training sessions, offers excellent opportunities for connection and collaboration.
If you are considering Webex as a primary or supplementary tool for virtual events, there are a few things you should know beforehand. Does Webex record meetings, and how can you do that? This article will help you understand the platform’s features and how to record a Webex meeting using different approaches.
Why Record Webex Meetings?
Recording Webex meetings enhances access to crucial materials within the organization. Anyone can follow the agenda and revise key information at any time.
Recording online calls on Webex also improves transparency and documentation in the company, enabling managers to set goals, evaluate employee engagement, and conduct objective performance reviews. It’s an investment in the clarity, efficiency, and continuity of the organization’s progress.
Webex Recording Capabilities and Account Types
Webex recording capabilities differ from other video conferencing platforms and depend on the account type and device used. The following sections provide an overview of subscription plans, presentation rules, and more.
Webex Subscription Plans
The platform offers several account types, such as:
- Webex Free
- Starter
- Business
- Enterprise
How to Present a Project via Webex
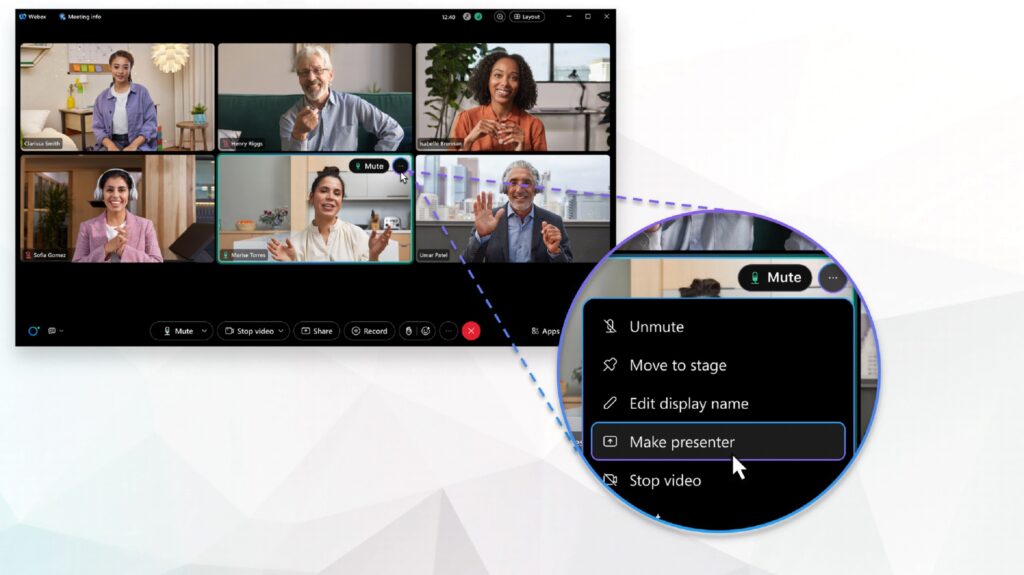
Sharing the screen to present a project or presentation is possible, although the meeting host must first approve it. The call administrator must designate a presenter on the panel and change the person’s role from guest to presenter.
Follow a generally accepted courtesy code and ensure your presentation is on topic and straight to the point. It’s also a good practice to share the recording file with the host and get approval before the meeting starts.
Webex Recording Based on Device
Webex supports recording meetings on PCs and smartphones, though some features depend on your subscription plan. Free users can only record a Webex meeting using a desktop device and app, storing the meeting recording on their computer.
Free account types can’t record the session via smartphone using the built-in Webex feature. “How can I record a Webex meeting in that case?” you might ask. It’s possible to do so using embedded phone screen recorders or third-party tools like Sembly AI.
Webex Recording Requirements
Webex has a set of recording rules. Only certain types of meeting participants can use a Webex call recording feature. Here are four categories Webex divides participants into:
- Hosts. By default, only hosts can record the meeting. However, organizers can assign co-hosts and presenters and grant permission to record.
- Co-hosts. Co-hosts can only record the session if the original host is absent from the meeting. When the host returns to the call, it takes back the recording, totally controlling it.
- Presenters. Presenters share their screens with presentations, whiteboards, or other content. They can’t record Webex meeting unless the host permits them to do so through meeting controls.
- Attendees. Attendees can’t record Webex meeting using the built-in feature. Guests can ask hosts to enable them to record the call or use side applications.
Preparing to Record a Webex Meeting
Although you might not be able to record a Webex meeting using the platform’s built-in feature, there are alternative methods to achieve this. With the wide selection of side applications and built-in recording features, you can capture a meeting just as quickly. Whether on a smartphone or laptop, you must first prepare for the meeting recording. However, first:
Check Permissions
If you prefer to stick with the native Webex recording feature, you need to check recording permissions in Control Hub. As a host, you can extend the recording permission to co-hosts, participants, or both. You can also decide whether to give co-hosts more freedom over recording layout or limit them to the view-only option. In any case, follow these steps:
- Go to Services > Meeting
- Click Settings
- Scroll down to Cloud recordings and choose who can record
- Set the recording details by toggling on or off the Allow co-hosts view-only privileges option
Inform Participants
When using Webex’s native feature, you don’t necessarily have to inform party members that you’ve started recording. Participants receive an audible notification with a Red Light icon on the screen when the recording is in progress.
However, it’s recommended to notify people that you plan to record the meeting using third-party software or a mobile screen recording app.
Test Your Equipment
Testing your setup is crucial to complete the preparation stage and ensure everything functions smoothly. Run an internet connection speed test to see if the bandwidth allows you to use the camera. If your Wi-Fi can’t handle the video call, Webex will automatically lower your resolution or even turn off your video. You can also call a colleague to test your camera, microphone, and speakers.
How to Record a Webex Meeting
If you are a host, alternate host, presenter, or participant with permission to record the call, knowing how to record a meeting in Webex is several steps away.
Install the app and log into the profile
Download the Cisco Webex desktop app to access the recording feature. While others can tune into video meetings via Chrome browser, you must get the app to have a recording feature. Otherwise, it will be disabled.
Next, log into your account using your credentials to schedule or start the meeting.
Start recording once the meeting is on
After going live, navigate to the bottom panel, click “Record” next to the Share button, and view a list of saving options. You can save the file locally or to the cloud if you’re subscribed to the paid Webex plan. Free users can only save to computer storage.
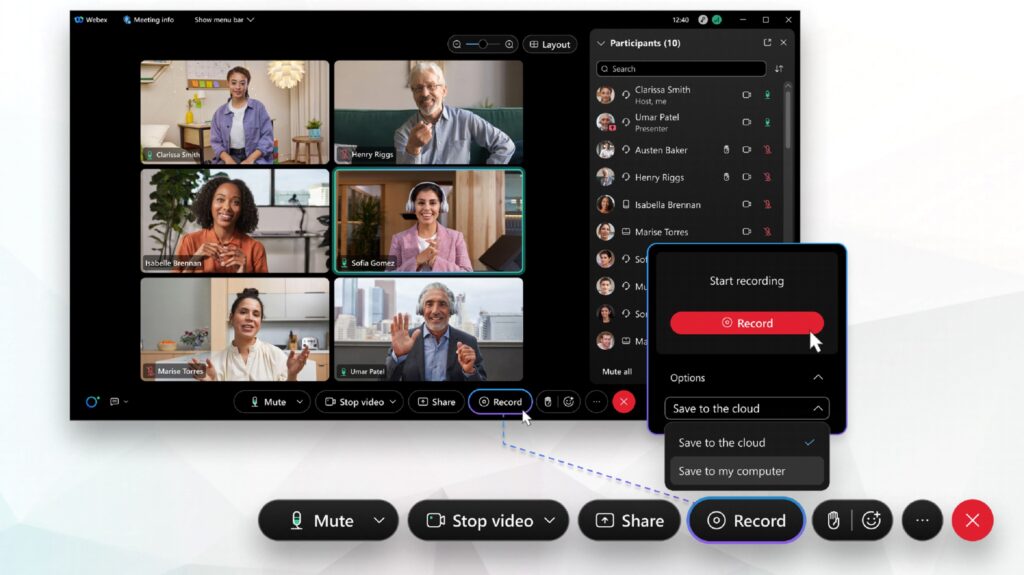
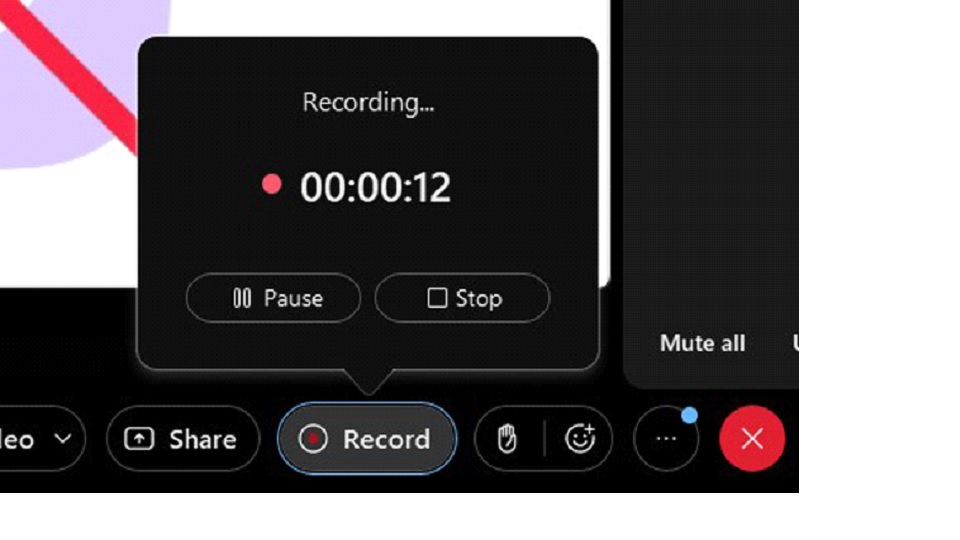
When all is set, click the “Record” button. The Webex native recording method allows for pausing recordings. You can pause and resume recordings by pressing dedicated options in the same popup window. Upon pressing “Stop,” the file will go to the provided documents folder.
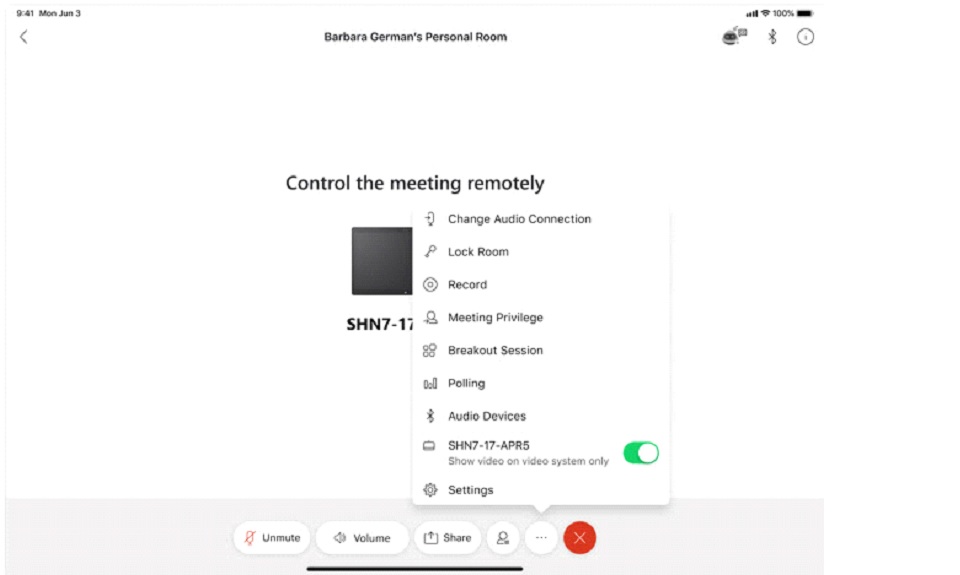
Recording a Webex Meeting as the Host
Webex meeting organizers control all settings. As a host, you decide who can record the meeting and whether it starts immediately after the call has begun. You can do all that in Control Hub.
Recording a Webex Meeting as a Participant
Participants can only press the dedicated button to start and stop the recording. To record Webex meeting as a participant, you need to get the host’s permission to record. A host must go to the participants panel, locate the “More” button, and click “Allow record,” thereby making you an alternate host or presenter. Alternatively, a PowerPoint recording feature can help you capture the call and share it with other call members.
Start the actual recording
Click “Record” on the same panel to start recording when allowed. There won’t be a drop-down menu with saving options. However, participants can pause and resume the recording.
After pressing the “Stop” button, the file will be saved to the storage selected by the host.
Use alternative applications
As mentioned, the native Webex recording feature prevents participants from unauthorized recording. In justified cases, a third-party recording tool can fully capture the meeting agenda and ensure everyone is on the same page over time. However, following regulations established by a space owner is essential to avoid privacy violations and professional misconduct.
How to Record a Webex Meeting on your Mobile Phone
Webex does not permit free users to record video meetings on a mobile device. If you have a free subscription plan, move to the next section to learn about how to record a Webex meeting by phone. Follow these simple steps if you’re a paid-plan user:
- Install the Webex mobile application and log into your profile
- Start or join the meeting
- Tap three dots on the chat panel
- Tap “Start recording”
In some Webex mobile app versions, this is followed by a meeting audio prompt stating that the call is being recorded.
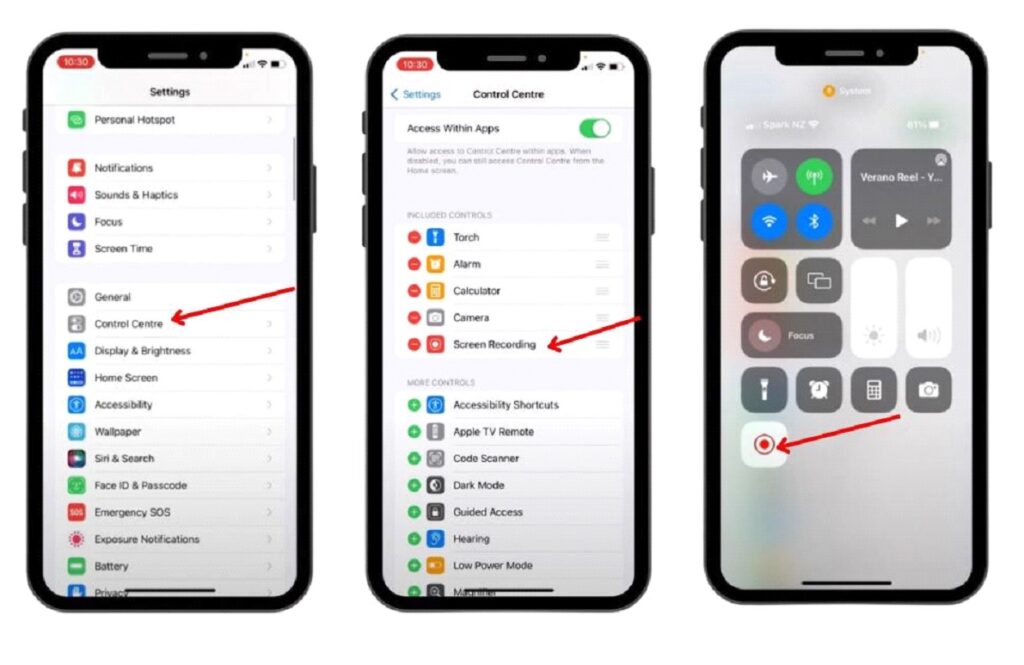
On iPhone
Whether iPhone or iPad, paid users have a built-in feature to record meetings. It’s located on the panel next to the end call button. Press the ellipsis to see a characteristic symbol.
While free users can’t record meetings on the mobile app, there is still a way to capture a meeting by native screen recorders. If you’re an iPhone user, here are the steps to record an online call even if you’re a participant with the native recording tool:
- Go to Control Center in the Settings. Allow for Screen Recording Feature by tapping +
- Launch the Webex app and join the meeting
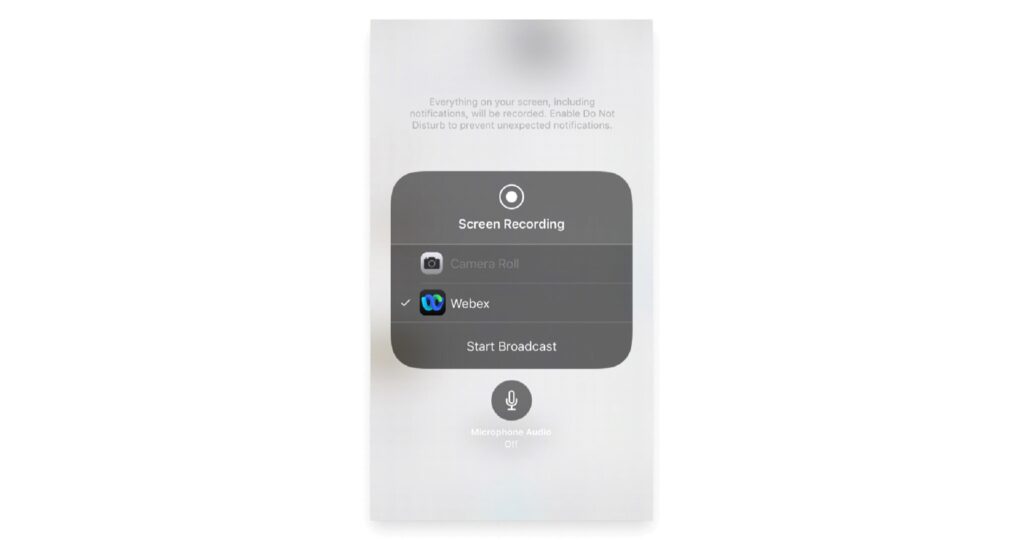
- Swipe down from the upper-right corner
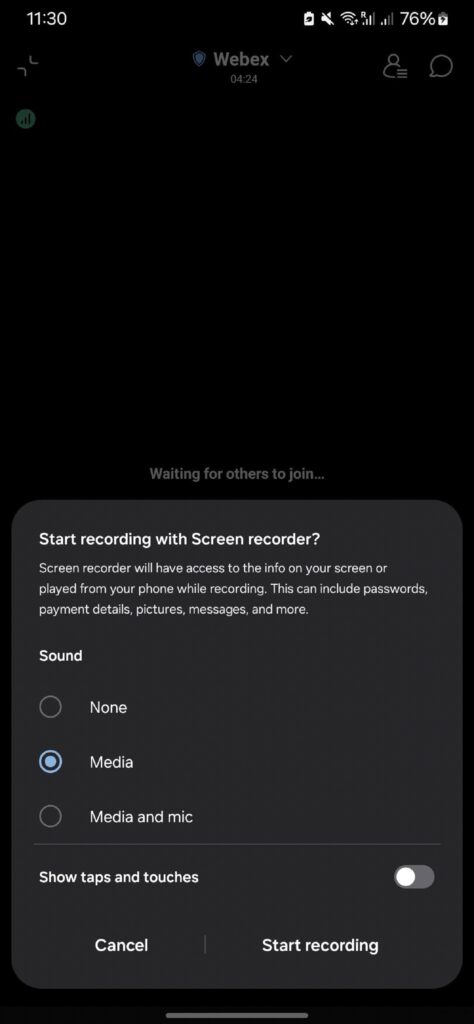
- Tap the screen recording icon (a dot inside of a circle) and wait three seconds for the recording to begin
- Stop the recording whenever you need to by tapping on the same icon
On Android
You can also capture Webex calls in-app on an Android device using a paid account. The Record button is located in the same place.
Depending on your Android version and mobile phone, the steps for screen recording may vary. Nevertheless, here’s how to give you a general idea of how to record a Webex meeting on Android:
- Join the meeting

2. Swipe down the curtain to access the Quick Settings panel
3. Tap the Screen recorder icon
4. Set up the confirmation screen with your preferred parameters and tap “Start recording.”
5. Pause and resume the recording as needed
6. Tap the stop icon on the floating bar to stop the recording
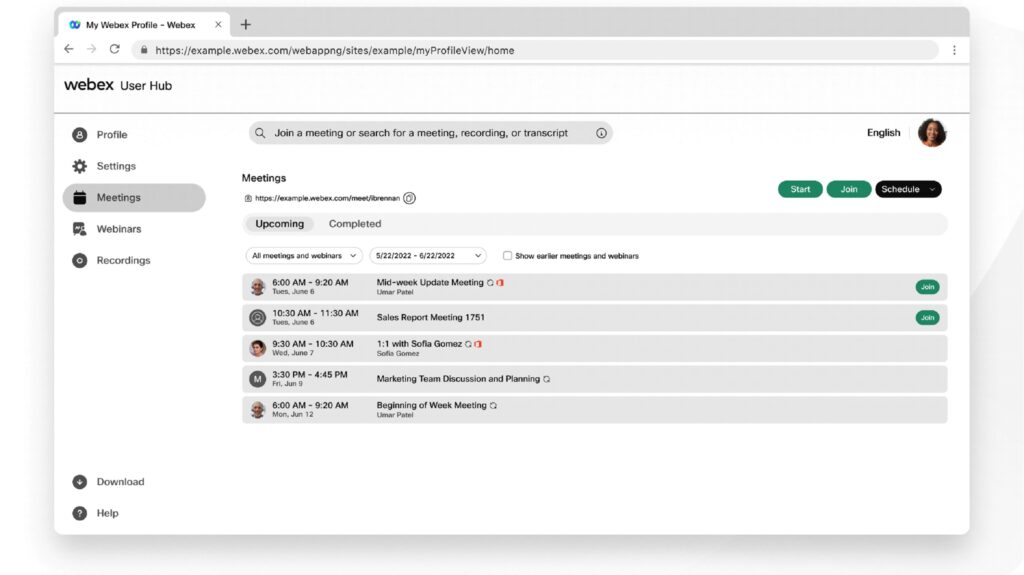
Accessing Your Recordings
Accessing Webex recordings is simple. The easiest way to reach all the files is through the desktop app. For added flexibility, you can view the files by signing into your Webex account, going to the User Hub, and then the “Recordings” section.
Editing Your Webex Recording
Whether you want to divide the recording into several files or trim out unnecessarily long intros and outros, you can do that using the Webex editor. Follow these steps:
- Sign in to your account, go to Recordings, and locate the MP4 file you wish to edit
- Click Play and select “Edit playback range” in the lower right of the screen
- Determine when you want your recording to start and drag the “playback start control” there
- Select “Save playback range” and exit editor to save a new recording version
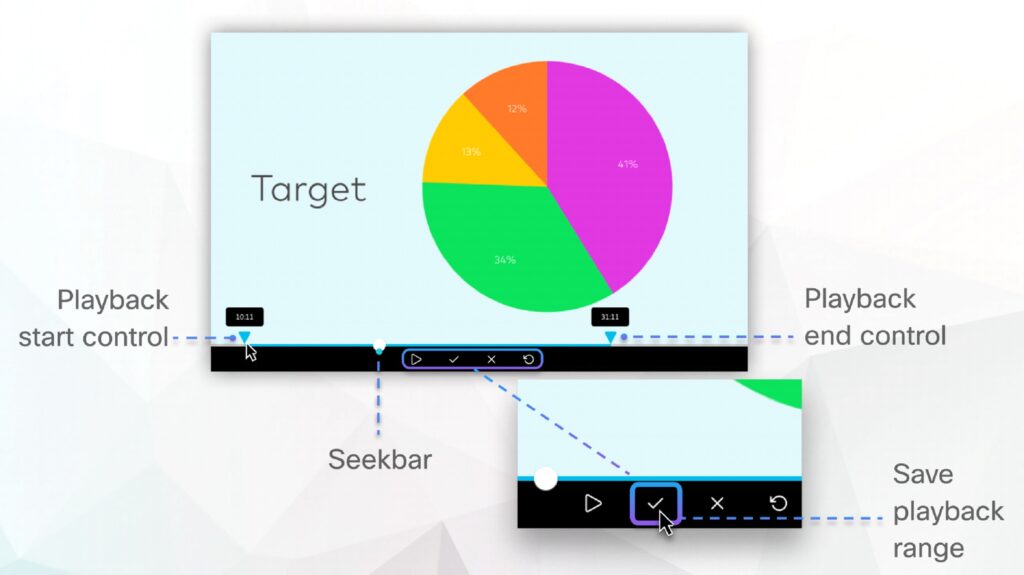
You can revert changes by clicking “Edit playback range” and then “Restore original playback range.”
Sharing Your Recording
You can share your Webex meeting recording with those who did and didn’t attend the meeting via email or a protected link. Follow these steps:
- Sign in to User Hub
- Go to Recordings
- Select Share next to the recording name
- Provide all the necessary information in the popup menu
You can also create a password for the recording link to prevent unauthorized access to the file.
Troubleshooting Common Issues
Users might occasionally encounter issues when using Webex. According to the Webex Help Center, the most common problems are:
- Hanging at starting Webex
- Missing the green Join Meeting button
- Hanging at “One Moment Please”
The Help Center provides detailed step-by-step guides on addressing those issues effectively and starting to record Webex meeting, so it pays to monitor the website closely.
Privacy and Compliance for Webex Meeting Recording
Ensuring privacy and compliance for Webex meeting recordings involves following data protection laws. Organizations must notify participants about the recording through verbal alerts and on-screen indicators, as CCPA and GDPR require. With Webex, recordings are securely stored, and access is restricted to authorized personnel.
How to Record Webex Meeting Using Sembly
To record a Webex meeting with Sembly, start by setting up your Sembly account and linking it to Webex. Then, go to Sembly and navigate to integration settings, connect your Webex profile, and allow Sembly to join your meetings as an attendee for recording purposes.
Schedule the meeting and invite Sembly by adding its unique email address. Once the meeting starts, Sembly will join and capture the meeting without manual intervention.
After the meeting, Sembly processes the recording and generates a detailed transcription accessible from the Sembly dashboard. You can review, edit, and share the transcript and recording. With multiple features Sembly provides, your recordings will be more than files to play in the background. Sembly AI is an intelligent all-in-one recording tool that can generate easy-to-follow summaries and offer timestamps to key takeaways. Moreover, you can use keyword searches and highlights to quickly scroll through recording transcripts and find crucial information, making post-meeting reviews productive and time-efficient.
FAQs
Why Do I Not See an Available Recording Option on Webex?
You might be unable to record a Webex meeting for several reasons, like using Webex on a browser, on a phone with a free plan, or being a participant. Check out the troubleshooting page to see if others have encountered this. If you’re a meeting participant, request to record through the panel.
You may also want to replace the native recording feature with reputable third-party tools like Sembly AI and record an important meeting without worrying about the temporary problems with Webex recording.
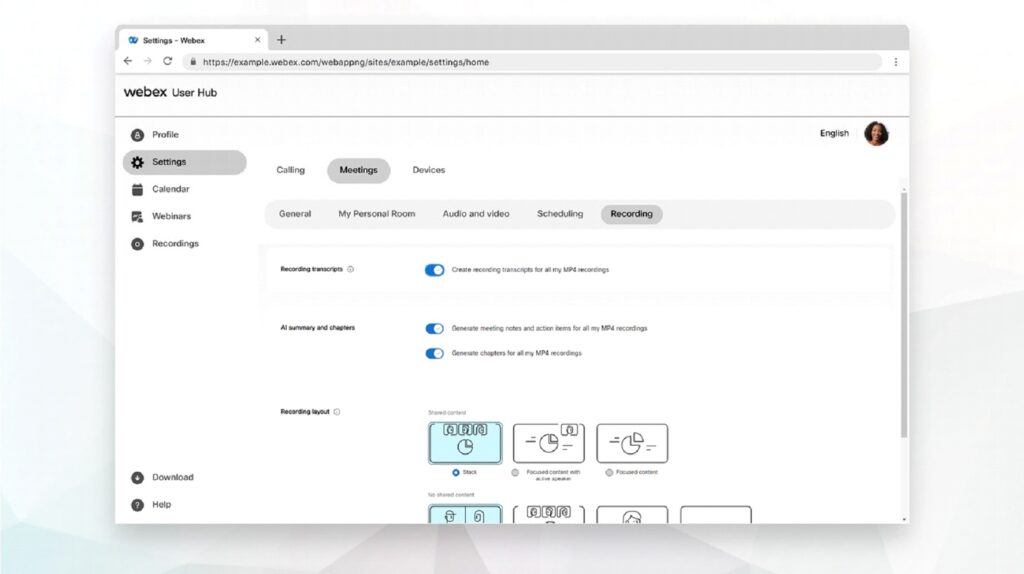
Does Webex Provide Recording Transcripts?
The transcribing option is turned on by default for meetings. You can turn it off and on as you wish in the settings. If you’ve turned on recording transcripts through the administration panel, you can get them from User Hub in the Recordings subsection for your virtual events.
Can you record a Webex meeting automatically?
You can if you’re a host only. Sign in to your Webex site and select your name in the upper right corner. Then click Webex Administration, Select Configuration, and choose Webex Meetings. Check “Automatically record all sessions using Network Based Recording” in the Site Options. Click Update.
Introducing Semblian 2.0
- ✦ Multi-Meeting Chats
- ✦ AI Insights
- ✦ AI Artifacts