
Table of Contents
ToggleHave you lost track of where your Zoom recordings go after a meeting? You’re not alone. Many users want to know how to find Zoom recordings but struggle with the different storage options. This guide will help you locate your recordings in a few simple steps. Without any further ado, let’s dive!
Types of Zoom Recordings
Zoom offers two ways to record your meetings: cloud and local recording. Where to find Zoom recordings depends on your choice – cloud storage keeps them in your online account, while local saves them to your computer’s hard drive. Typically, you make this choice when you start recording your Zoom meeting. The choice between cloud and local recording directly affects where your files end up and how you can share them. We’ll explore the details of each method in the next sections.
Cloud Recordings
Cloud recordings store your meeting files on Zoom Cloud (online servers) instead of your device. From team goal-setting sessions to everyday discussions, you can access and share these recordings through your Zoom account and easily share them with a simple link. This option works well for teams who need easy sharing, but it requires a paid Zoom subscription and comes with storage limits.
Local Recordings
Local recordings save directly to your computer’s hard drive, similar to downloading a file. Your computer stores these recordings in a Zoom folder, within your documents, making them easy to find and edit on your device. While this option is free and works with any Zoom account, the files take up space on your computer and can be harder to share with others.
Where to Find Local Zoom Recordings?
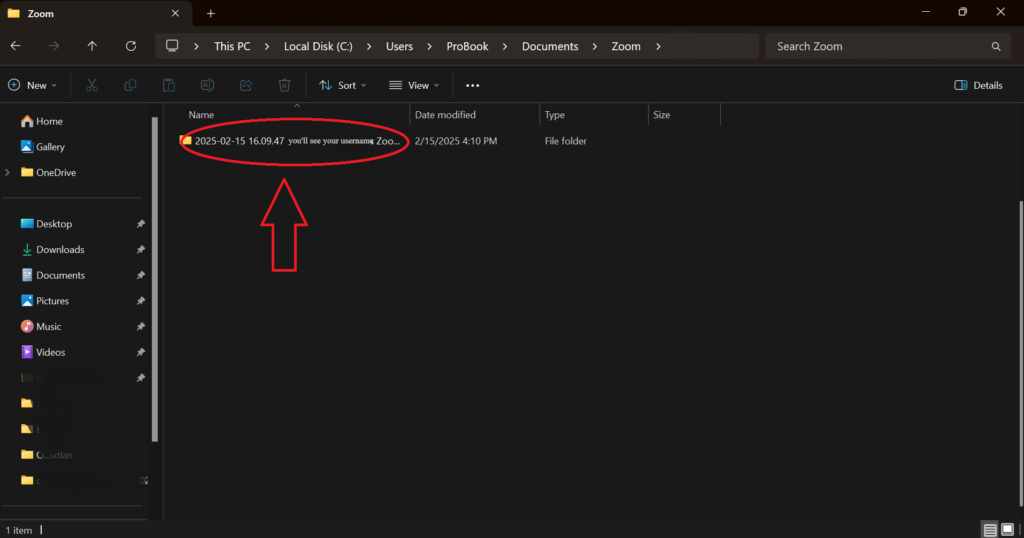
Where do Zoom recordings go when you choose local storage? The files save to a default Zoom folder in your Documents directory unless you pick a different location intentionally. Each recording creates its own folder with the meeting date and name.
Where does Zoom save recordings varies by operating system. Windows and Mac use different default folders within Documents, so you’ll need to check the right location for your exact OS. Consider that local recordings only stay on the computer you made them, meaning you can only access these files from that very device.
Default Storage Location for Windows
Here are 4 simple steps to find Zoom recordings in the default storage location on Windows:
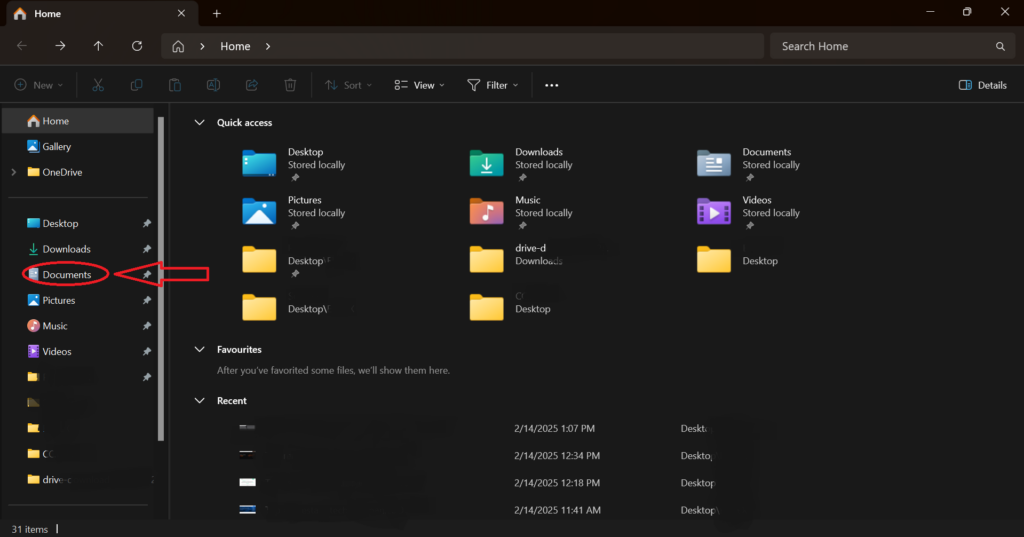
Step 1: Press Windows + E to open File Explorer
Step 2: Click the Documents folder in the left sidebar
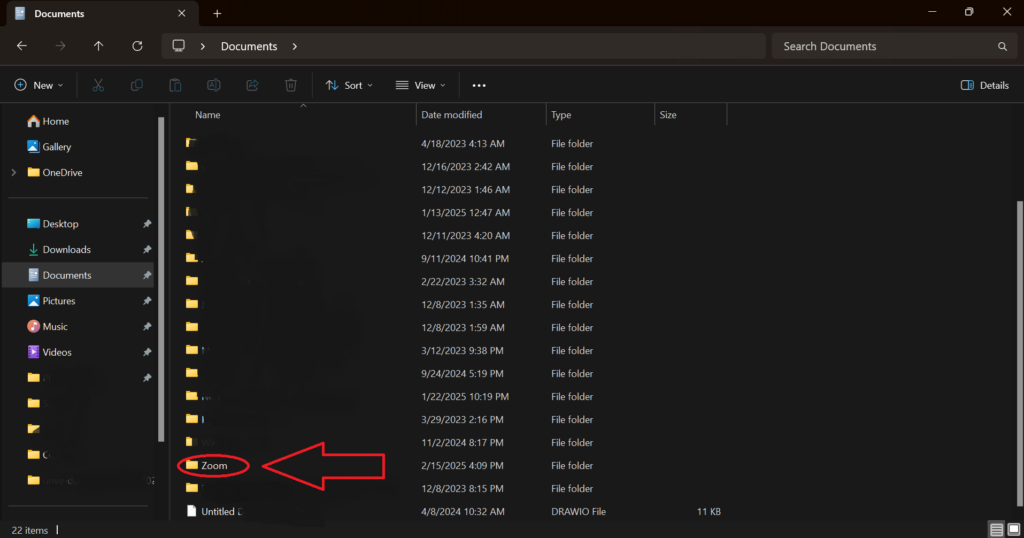
Step 3: Find and open the Zoom folder
Step 4: Select the meeting date folder to view your recording files
Default Storage Location for Mac
Here are 4 simple steps on where to find Zoom recordings in the default storage location on Mac:
Step 1: Click the Finder icon in your Dock
Step 2: Click the Documents folder in the left sidebar
Step 3: Open the Zoom folder
Step 4: Select the meeting date folder to view your recording files
How to Change the Save Location
Still can’t find your recordings? Your Zoom desktop app might be using a different recording folder for your meeting content. Let’s check your current Zoom recording location and learn how to change it.
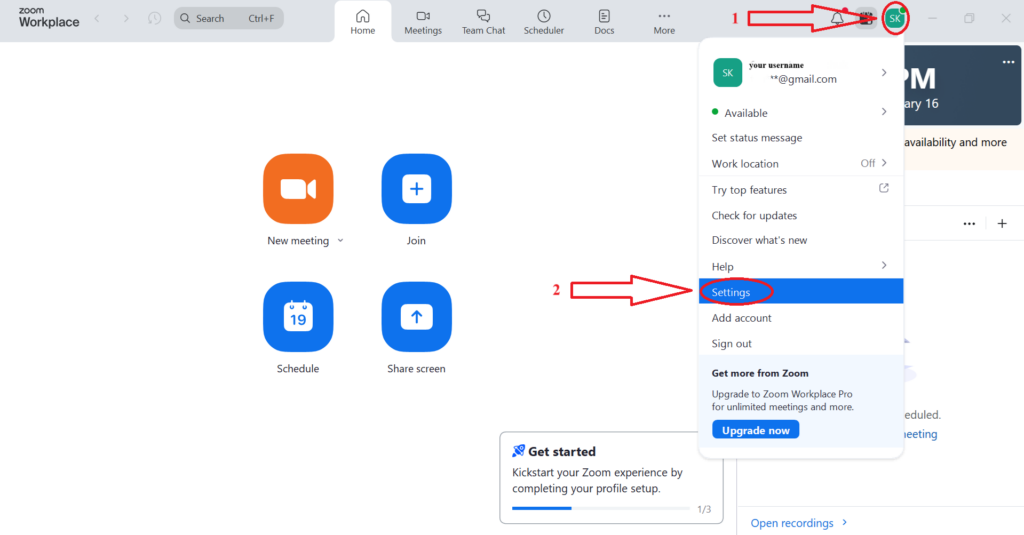
Step 1: Open the Zoom desktop app and sign in
Step 2: Click your profile picture (top-right corner)
Step 3: Select Settings

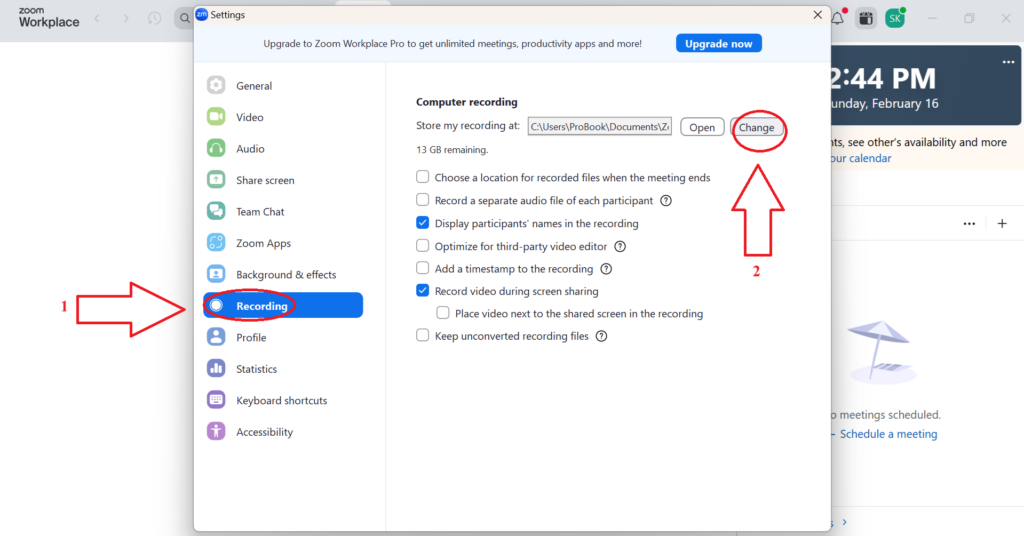
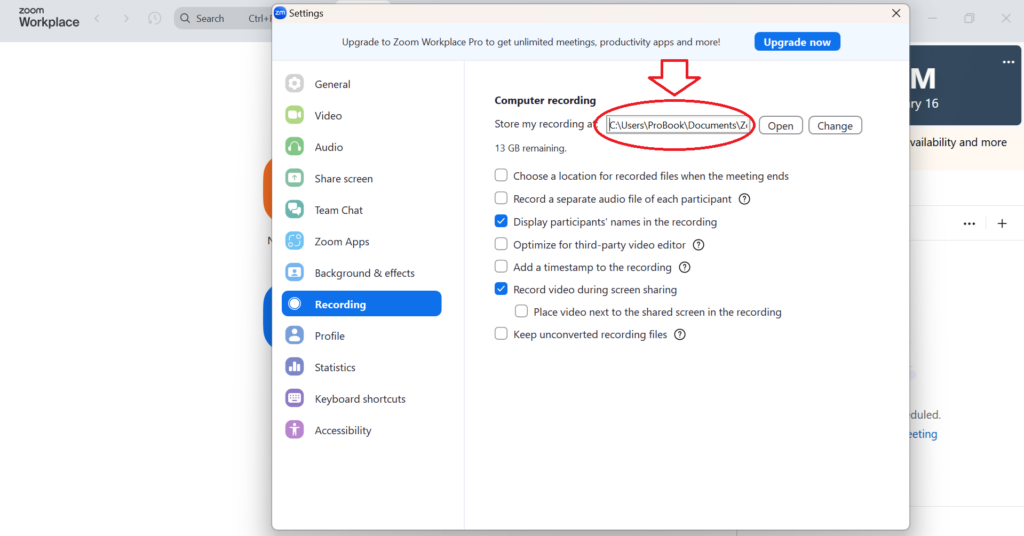
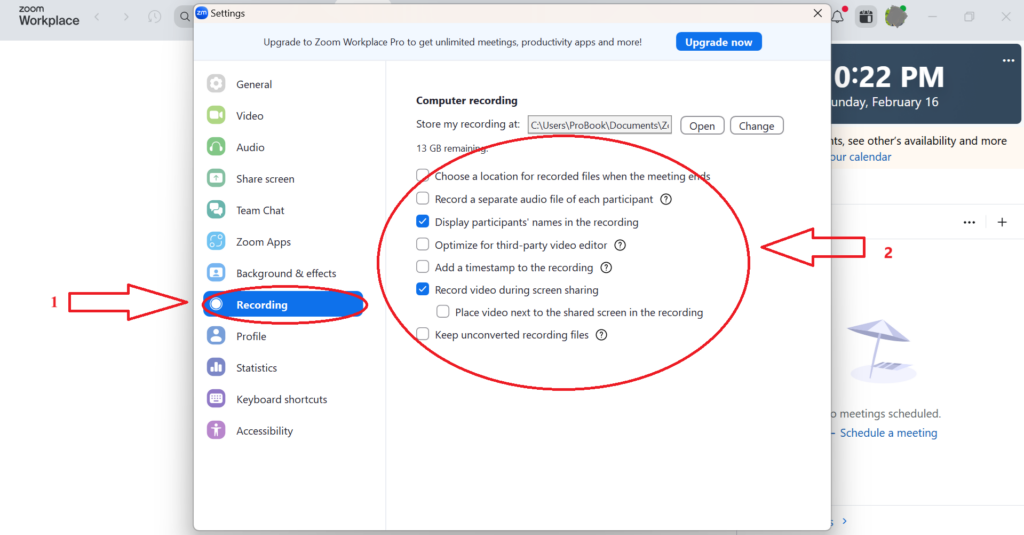
Step 4: Click Recording in the left menu
Step 5: Under “Store my recording at”:
- Windows: Click Change to pick a new Zoom recording location;
- Mac: Click the current directory path to select a new folder
Note: Choose a folder on your computer, not a network drive, to avoid storage issues;
Where to Find Zoom Cloud Recordings?
Didn’t find anything on your computer? Let’s try to access your Zoom cloud recordings. These files don’t take up storage space on your computer since they’re stored online. Here’s how to access Zoom recordings via Zoom cloud.
Step 1: Go to Zoom.com and sign in
Step 2: Click Recordings in the left sidebar
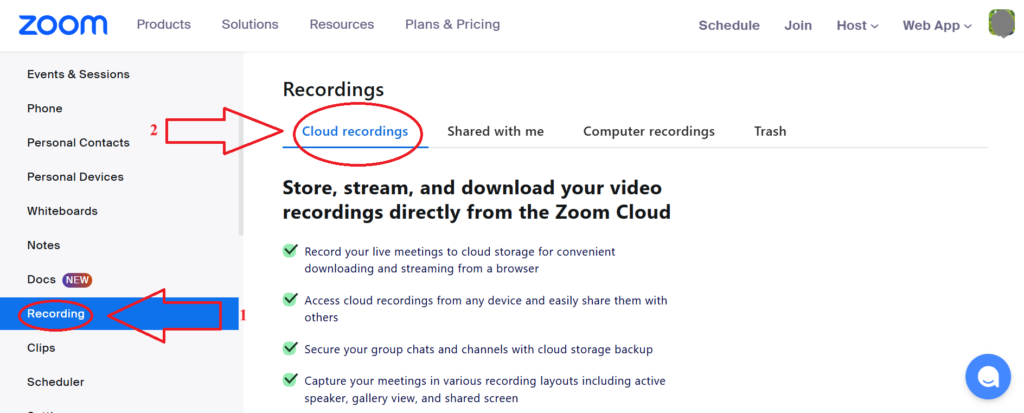
Step 3: Select the Cloud Recording tab
Step 4: Choose the recording.
Note: Cloud recording requires a paid Zoom subscription (Pro, Business, Education, or Enterprise plan).
How to Locate a Missing Zoom Recording?
Still don’t know where to find your Zoom recordings? Let’s check three common places where your files might be hiding.
Checking Your Zoom Settings
We mentioned before that the location of the recording can be changed via the Zoom desktop app.
Step 1: Open the Zoom desktop app
Step 2: Click your profile picture > Settings > Recording (we have shown how to do this in the “How to Change the Save Location” section).
Step 3: Look at “Store my recording at” path
Step 4: Check this location on your computer.
Search Your Computer
Step1:
Windows: Press Windows + E and choose This PC on the left sidebar
Mac: Click the magnifying glass
Step 2: Type your Zoom username or meeting date (yyyy-mm-dd)
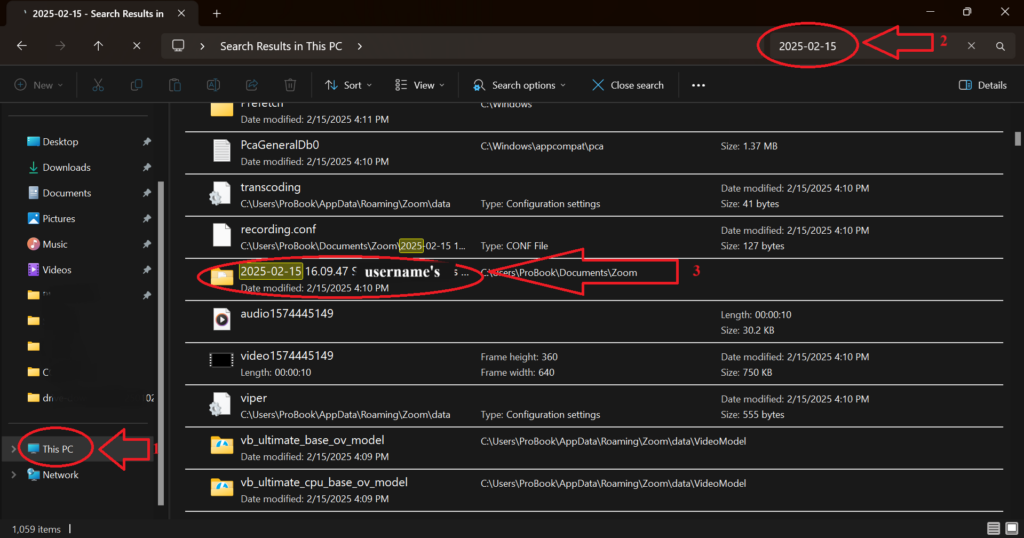
(Optional) Step 3: Look for files ending in .mp4 or .m4a (a default file format for Zoom meeting recordings)
Check Trash Bins
Computer: Lock in Recycle Bin (Windows) or Trash (Mac)
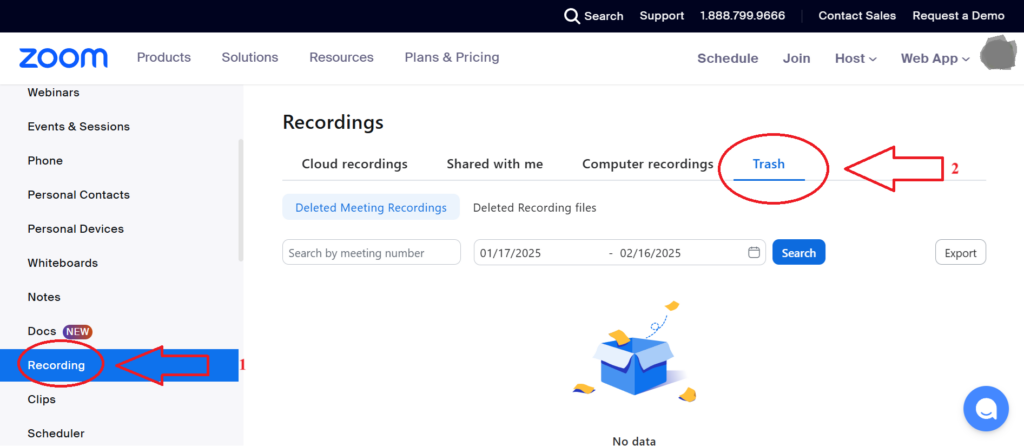
Cloud: Go to Zoom.us > Sign in > Recordings > Trash
Note # 1: Recordings stay in cloud trash for 30 days.
Note # 2: Always check both computer and cloud locations, as your recording might be in either place.
How to Change Zoom Recording Settings?
You can further adjust settings for both local and cloud storage to match your exact needs. Here’s how to set up recording preferences for both options:
Changing the Local Recording Settings
Step 1: Open the Zoom desktop app and sign in
Step 2: Click your profile picture > Settings
Step 3: Select Recording in the left menu
Step 4: Under “Computer recording,” you can:
- Choose storage location
- Enable automatic recording
- Set recording format
Changing the Zoom Cloud Recording Preferences
Step 1: Sing in to Zoom.com
Step 2: Click Settings > Recording
Step 3: Under “Cloud recording,” select:
- Speaker view or gallery view
- Audio options (single or separate files)
- Chat saving preferences
- Timestamps
- Name display
- Transaction options
How Long are Zoom Recordings Stored?
Now that we know where Zoom recordings go, let’s look at how long they stay available.
Cloud Storage:
- Cloud recordings stay available as long as you have a paid Zoom account;
- Files don’t expire by default;
- Admins can set auto-delete after a specific time period;
- Deleted recordings move to trash for 30 days (if enabled).
Local Storage:
- Recordings stay on your computer until you delete them;
- Storage time depends on your available disk space;
- Keep in mind that video files take up significant space.
Note: To check auto-delete settings, go to Zoom.com > Account Settings > Recording tab. Look for “Delete cloud recordings after a specified number of days”
Troubleshooting Common Zoom Recording Issues
Low Disk Space Error
Step 1: Check available storage on your computer
Step 2: Delete unnecessary files, empty recycle bin/trash, or move large files to external drive
Step 3: Try again
Step 4: If it doesn’t work, try changing the default save location
Unable to Play a Recording
Solution # 1: Check the File Format
- Verify file ends in .mp4 or .m4a;
- Look for corrupt or incomplete downloads in case you downloading cloud recording;
- Try re-downloading if cloud recording.
Solution # 2: Update Software
- Install the latest Zoom version;
- Update your video player;
- Restart computer.
Solution # 3: Convert Recording
- Open the Zoom desktop app;
- Go to Meetings > Recorded;
- Find your recording;
- Click convert;
- Wait for the process to complete.
If it is still not working, try playing with another media player.
No Audio in the Recording
Solution # 1: Try Different Player
- Open with VLC or Windows Media Player;
- Change the default video player;
- Test in multiple players;
Solution # 2: Check Recording Settings
- Verigy mic wasn’t muted;
- Confirm the correct mic selected;
- Check the headset mute button.
Solution # 3: Test Audio
- Open Zoom audio settings;
- Test microphone;
- Make test recording;
- Verify sound works.
Take Your Zoom Recording to Another Level With Sembly AI!
Sembly AI brings a new dimension to how to get Zoom recording by joining your calls as a silent participant. The tool captures meeting content and creates detailed notes while protecting data privacy, helping Zoom users maintain proper meeting etiquette while focusing on meaningful discussions. Now, with Semblian 2.0, it uses AI to generate custom artifacts and provide multi-meeting insights.
With meeting minutes automation, your key discussions transform into organized and searchable content. Sembly AI not only detects important decisions and tasks but also identifies risks and requirements, making manual note-taking methods obsolete. The platform supports multiple languages and integrates with popular productivity tools, while Semblian 2.0 analyzes trends and creates comprehensive reports.
Access your content from a mobile device or share it with your team – Sembly automatically records and processes meetings across different platforms. The system stores your recording securely and lets you search through past meetings with ease.
FAQs
Where to find Zoom recordings?
Local recordings are in your Documents > Zoom folder, while cloud recordings are at Zoom.com under the Recordings tab. The location of where to find Zoom recordings depends on whether you chose local or cloud storage when starting the recording.
How to save Zoom recordings?
When starting a recording, choose between local (saves to your computer) or cloud storage (requires a paid account). Where do Zoom recordings go by default depends on you OS but you can always select a custom save location in Zoom settings. For the cloud, the file saves automatically to your Zoom account.
How to find recorded Zoom meetings in the cloud?
Sign in to Zoom.com, click Recordings in the left menu, then select the Cloud Recordings tab to see your saved meetings.
Where did my Zoom recording go and where is my Zoom recording?
Check both local storage (Documents/Zoom folder) and cloud storage (Zoom.com > Recordings). If still missing, look in your computer’s trash or Zoom cloud trash.
Where is Zoom recording saved and how to see Zoom recordings?
Zoom saves recordings either locally to your computer’s Documents/Zoom folder or to the cloud at Zoom.com > Recordings. Access local files through File Explorer/Finder or cloud recordings through your Zoom account.
Where do Zoom recordings go after deletion?
Local recordings move to your computer’s Recycle Bin (Windows) or Trash (Mac). Cloud recordings go to Zoom.com > Recordings > Tran and stay there for 30 days before permanent deletion.
Introducing Semblian 2.0
- ✦ Multi-Meeting Chats
- ✦ AI Insights
- ✦ AI Artifacts